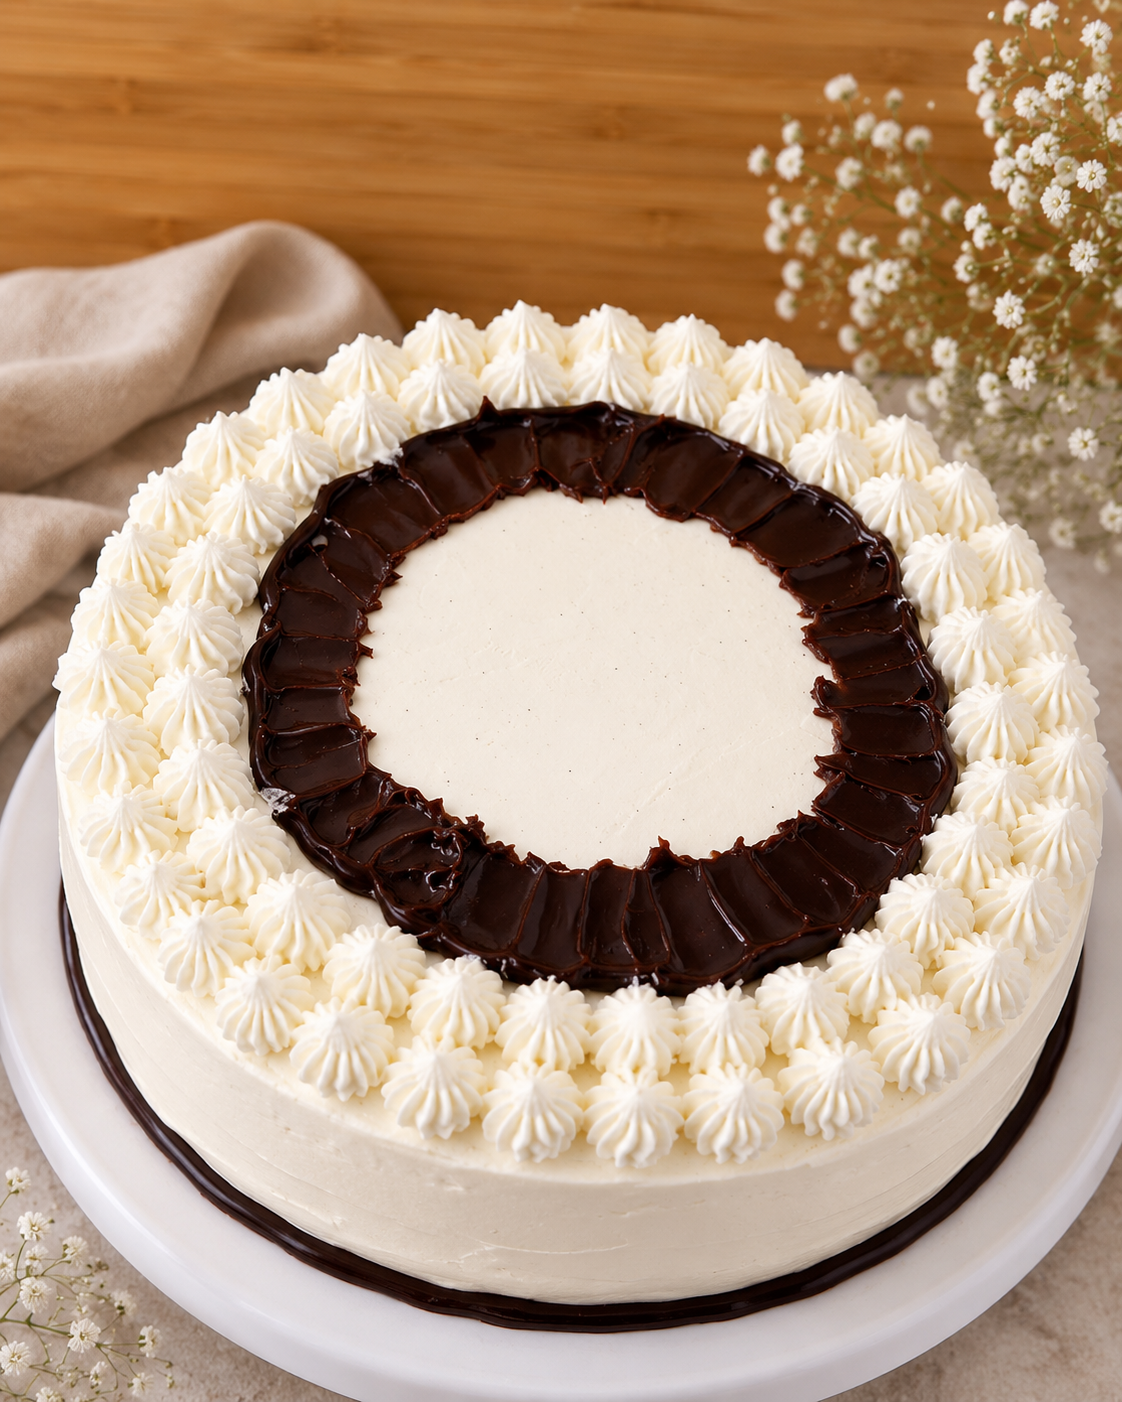
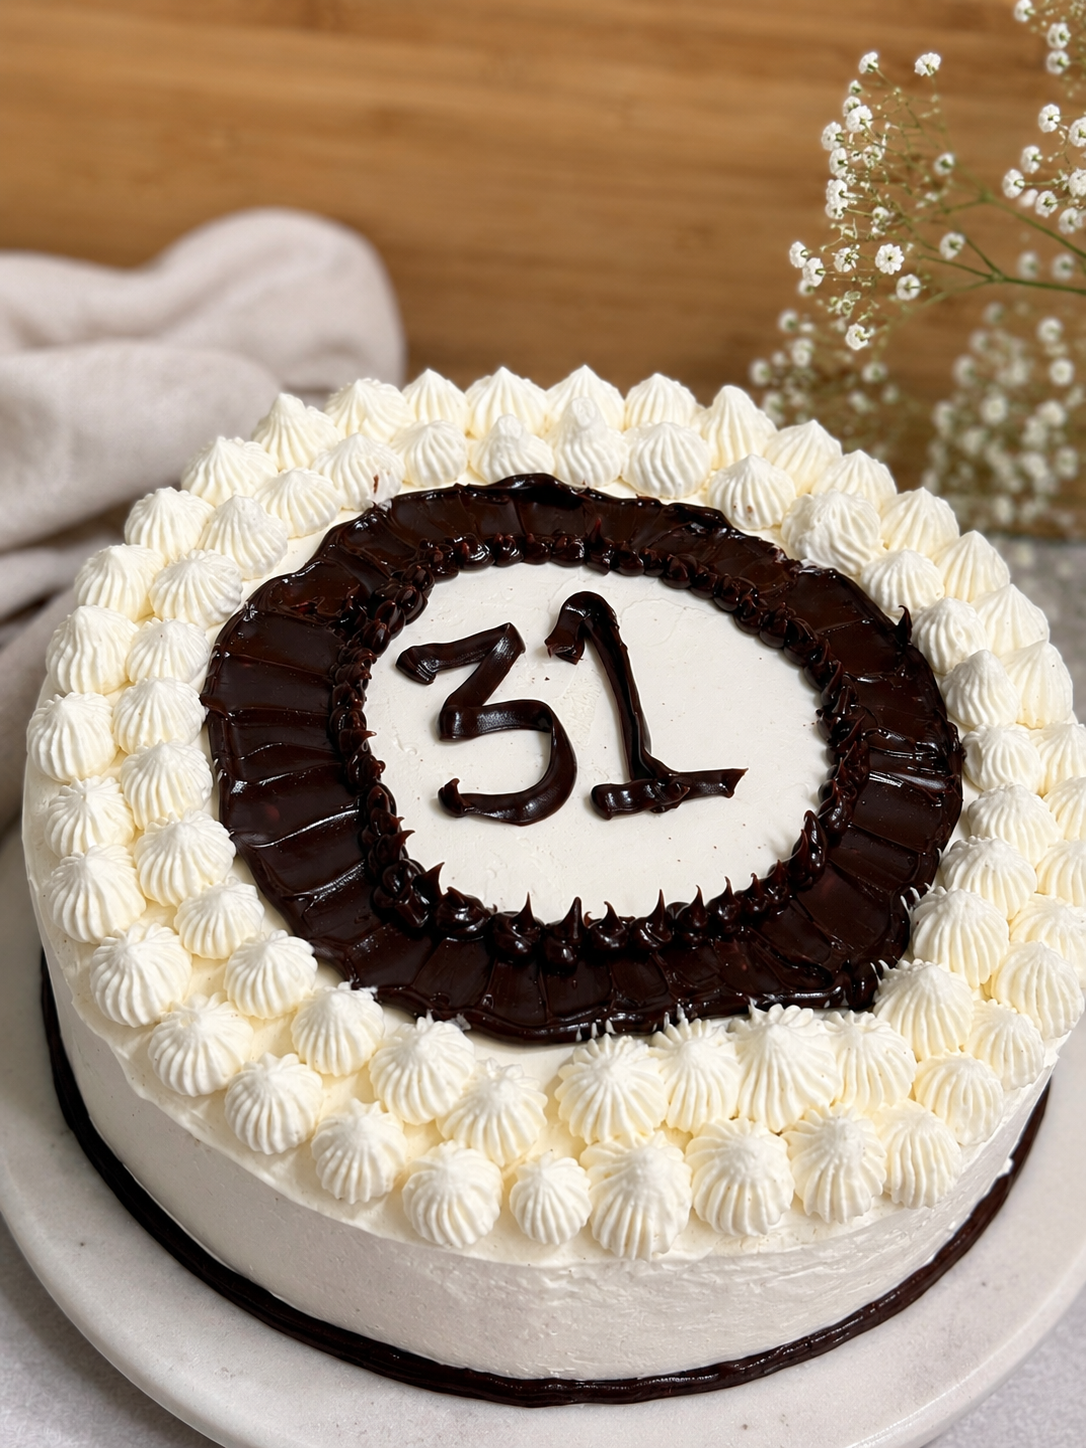
Chocolate, Vanilla Bean Ice Cream Cake with Cinnamon Bun Filling

This is the cake that makes people stop mid-conversation when it comes to the table. A rich, deeply chocolatey single layer cake — made with bloomed cocoa in coffee for maximum depth — topped with a generous spread of Trader Joe's cinnamon bun filling, a solid layer of vanilla bean ice cream, and finished with billowy whipped cream and hot fudge. It is every dessert you love in one slice.
The secret is treating each component separately and giving everything enough time to freeze properly. This is not a rush job — the 12–14 hour total time is mostly hands-off freezing. The actual active work is about 45 minutes. The result is a cake that looks and tastes like it came from a professional bakery and costs a fraction of the price.
A fully dairy free version is available further down — swapping non-dairy milk, non-dairy ice cream and a homemade non-dairy chocolate ganache in place of the cinnamon bun filling. Both versions are spectacular.
Why You'll Love This Ice Cream Cake
The coffee bloomed cocoa — blooming cocoa powder in hot coffee instead of water intensifies the chocolate flavour dramatically. The cake tastes far more chocolatey than the ingredient list suggests.
That cinnamon bun filling — the Trader Joe's cinnamon bun spread between the cake and ice cream layer is one of those combinations that should not work as well as it does. It absolutely does.
Hands off most of the time — the 12–14 hours is almost entirely freezing time. Your active work is about 45 minutes across two sessions.
Completely customisable — change the ice cream flavour, change the filling, change the decoration. The base recipe works with almost any combination you can imagine.
Dairy free version included — full dairy free recipe below with non-dairy ice cream, non-dairy whipped cream and a homemade chocolate ganache filling.
Perfect for celebrations — this is a birthday cake, an anniversary cake, a "I just felt like making something incredible" cake. It is genuinely show stopping.
The whipped cream holds — making your own whipped cream with sugar and vanilla gives you a stable, pipeable topping that firms up beautifully in the freezer.
Ingredients You Need
Full ingredients with measurements are in the recipe card below.
Cocoa powder — use a good quality unsweetened cocoa. The blooming step is critical — adding hot coffee or boiling water to the cocoa before mixing it into the batter dissolves the cocoa particles completely and intensifies the chocolate flavour significantly. Coffee is strongly recommended over water — you will not taste the coffee but it deepens the chocolate in a way water cannot.
Avocado oil — gives the cake a light, moist crumb without any flavour interference. Coconut oil works too but can add a subtle coconut note. Avocado oil is neutral and ideal.
Milk of choice — any milk works here. The dairy free version uses non-dairy milk in equal quantities with no other changes to the cake.
Haagen-Dazs Vanilla Bean — vanilla bean ice cream has the cleanest, most classic flavour that works with everything. Use whatever flavour you love — the method is the same regardless. Just make sure you give it enough time to freeze completely solid before assembling.
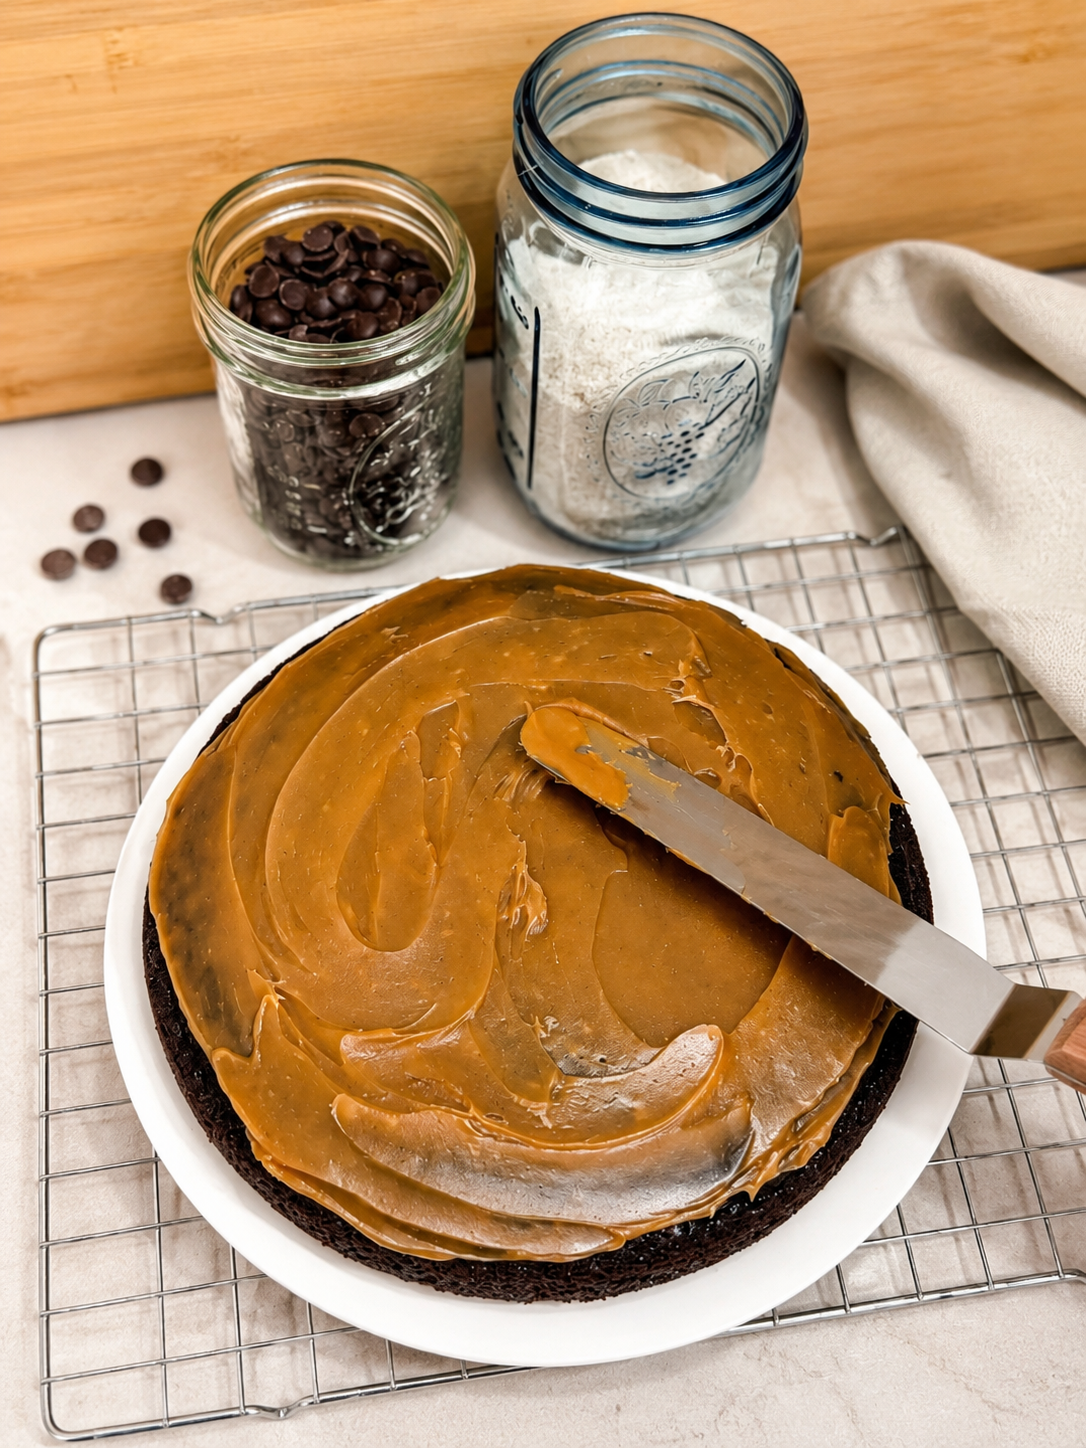
Trader Joe's Cinnamon Bun Spread — this is the surprise element that elevates the whole cake. Half a jar spread generously over the cooled cake before the ice cream layer goes on. If you cannot find it, hot fudge or a thin layer of chocolate ganache work beautifully as alternatives — see the notes section for the full ganache recipe.
Cold heavy whipping cream — the cream must be very cold for it to whip properly. Chill your bowl and whisk attachment in the freezer for 10 minutes before whipping for the best results.
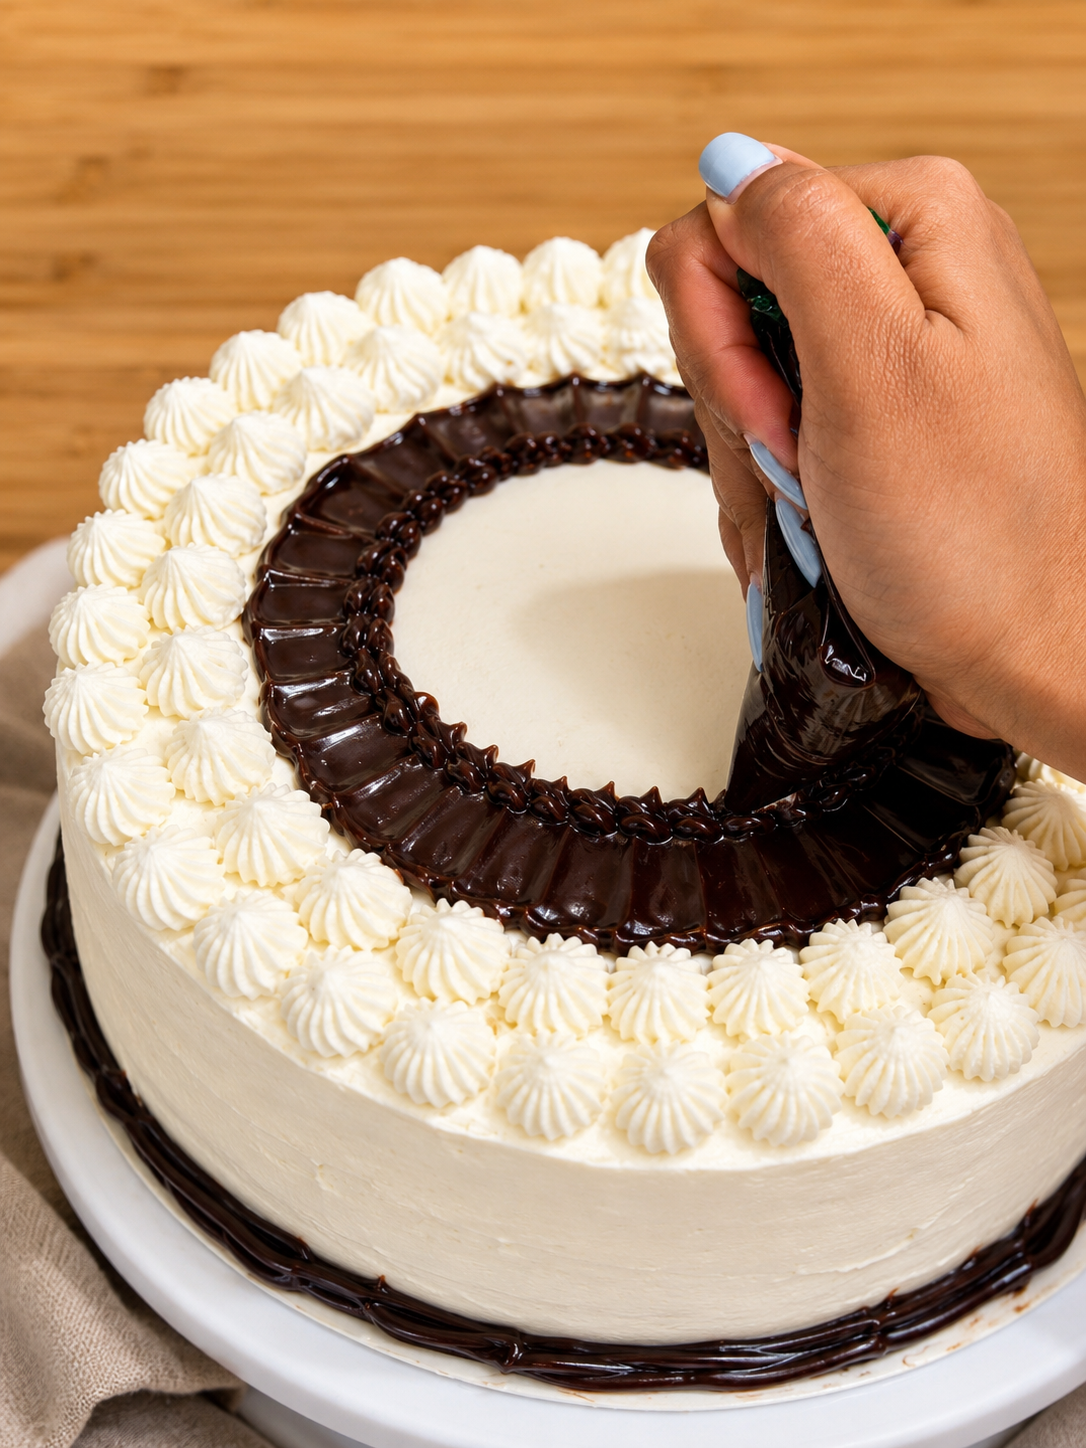
Hot fudge — use a good quality jarred hot fudge, warmed slightly so it is pourable. This goes on top of the whipped cream for decoration — drizzled in the center, piped around the edges, or however you want to get creative with it.
Tips for Making Ice Cream Cake
Give the ice cream layer enough time — 4–6 hours minimum but overnight is better. Every freezer is different. The ice cream layer needs to be completely solid before you can assemble the cake or it will shift and slide.
Plastic wrap is your best friend — line the pan generously with plastic wrap before adding the ice cream, with enough overhang to cover the top. This makes removal easy and prevents freezer burn.
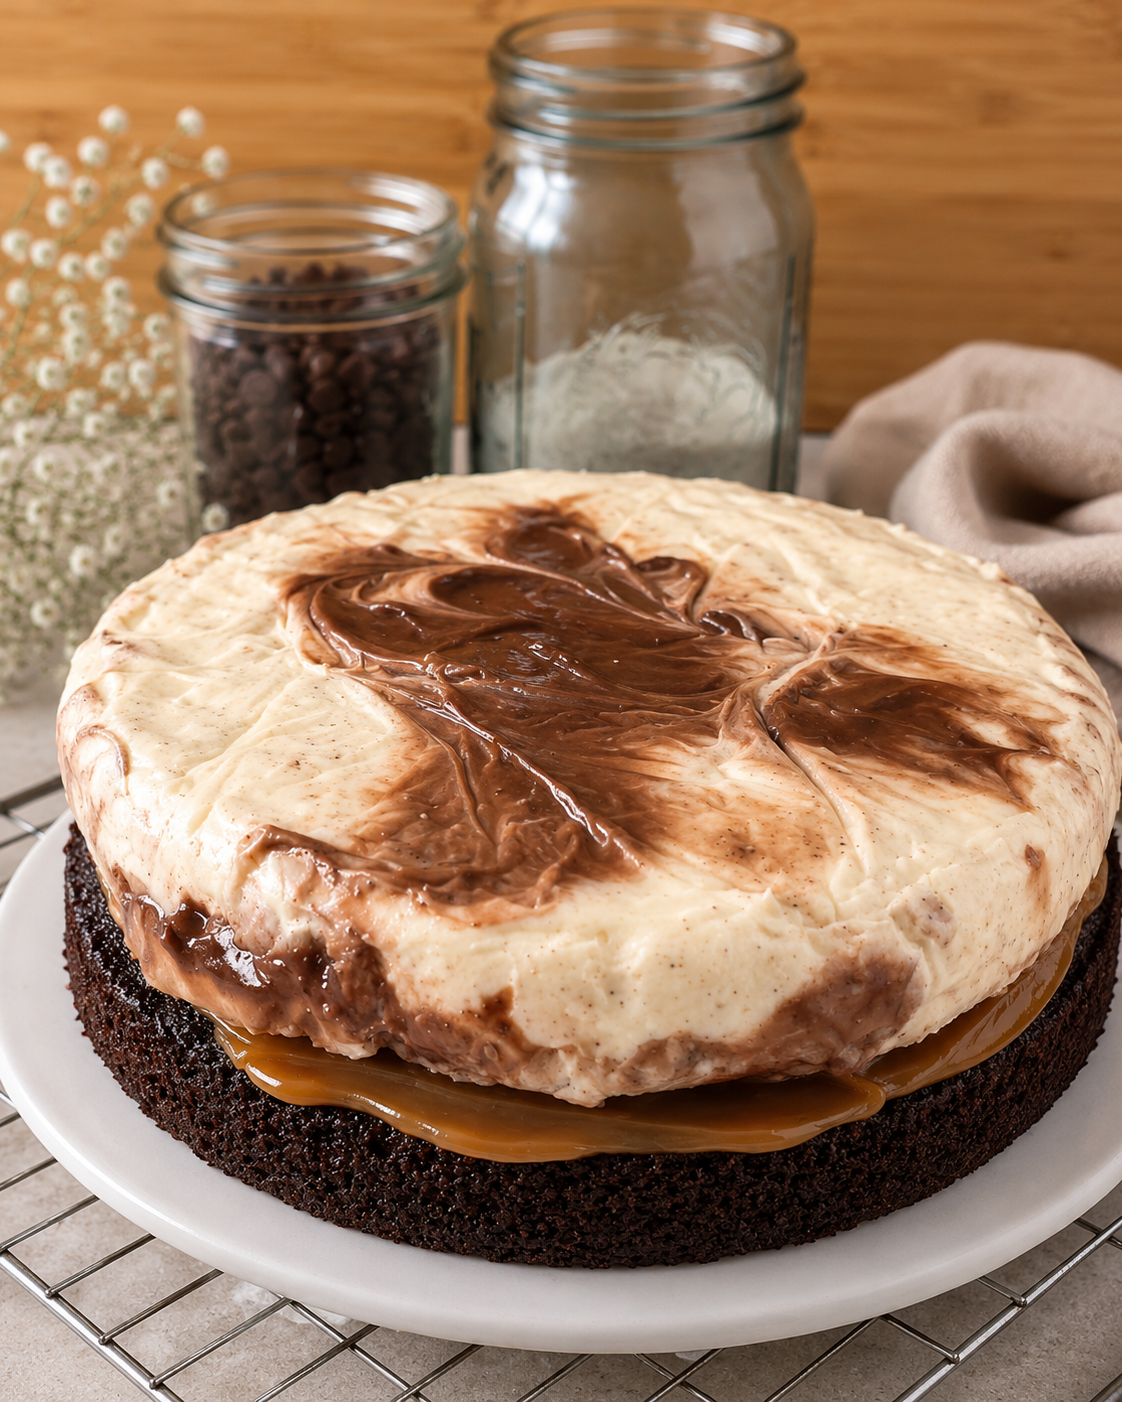
Non-smooth side down — when you place the ice cream layer on the cake, the non-smooth side (the side that was against the plastic wrap) goes down onto the filling. The smooth flat side faces up.
Align the layers before the final freeze — take a moment to make sure the ice cream layer is centered on the cake before putting it back in the freezer. It is much harder to adjust once the whipped cream is on.
Cold bowl for whipped cream — chill your mixing bowl and whisk attachment in the freezer for 10 minutes before whipping. Cold equipment makes a significant difference to how well and how quickly the cream whips.
Watch for firm peaks not stiff peaks — you want the whipped cream to hold its shape and be pipeable but not grainy or curdled. Stop the mixer frequently and check. Once it curdles you cannot fix it.
Work quickly when adding whipped cream — the cake will start to sweat as soon as it comes out of the freezer. Work efficiently — fill the gap between the layers first, then smooth the sides, then the top.
20 minutes back in the freezer before decorating — after the initial whipped cream application, freeze for 20 minutes. This firms everything up and gives you a much cleaner surface for the final decoration.
Warm your hot fudge slightly — cold hot fudge is too thick to drizzle beautifully. Warm it for 20–30 seconds in the microwave until it is just pourable. Let it cool for a minute before adding to the cake so it does not melt the whipped cream.
Slice with a warm knife — run your knife under hot water and dry it before each cut. This gives you clean, beautiful slices rather than dragged, messy ones.
Remove from freezer 5–10 minutes before serving — frozen solid is too hard to eat comfortably. A short rest at room temperature makes the ice cream perfectly scoopable and the cake perfectly sliceable.
How to Store
Freezer: Keep the assembled cake in the freezer covered tightly with plastic wrap or in an airtight container for up to 2 weeks. The whipped cream holds well when frozen.
Serving: Remove from the freezer 5–10 minutes before slicing. Warm your knife under hot water between each slice.
Leftover slices: Wrap individual slices in plastic wrap and return to the freezer immediately after serving.
Make ahead: The ice cream layer can be made up to a week in advance. The chocolate cake can be baked 2 days in advance and stored wrapped at room temperature. Assemble the day before serving.
Recipe
Prep Time: 45 mins active · Freeze Time: 12–14 hours · Total Time: 13–15 hours · Serves: 10 slices
Ingredients
For the Chocolate Cake
1 cup all purpose flour
1 cup granulated sugar
½ cup unsweetened cocoa powder
¾ tsp baking powder
¾ tsp baking soda
½ tsp salt
1 egg
½ cup milk of choice
4 tbsp avocado oil or coconut oil
½ tbsp vanilla extract or paste
½ cup boiling water or hot coffee to bloom the cocoa
For the Ice Cream Layer
2 pints vanilla bean ice cream (Haagen-Dazs recommended)
For the Filling
½ jar Trader Joe's Cinnamon Bun Spread (or to taste)
For the Whipped Cream Topping
1 pint heavy whipping cream, very cold
3.5 tbsp powdered sugar
1 tbsp vanilla extract or paste
For Decoration
Hot fudge sauce, warmed slightly
Instructions
Make the Ice Cream Layer
Line a 9 inch cake tin generously with plastic wrap, leaving enough overhang to cover the top.
Using an ice cream scoop, transfer both pints of ice cream into the lined pan.
Cover with another layer of plastic wrap and press down firmly to create an even flat layer that fills the pan.
Freeze for 4–6 hours minimum or overnight until completely solid
Make the Chocolate Cake
Preheat oven to 350°F. Grease a 9 inch cake pan with avocado oil spray and line the bottom with parchment paper.
Sift flour, sugar, baking powder, baking soda and salt into a large bowl. Whisk to combine.
In a separate bowl sift in the cocoa powder and pour in the hot coffee or boiling water. Stir until fully bloomed and smooth. Set aside.
In a medium bowl whisk together milk, egg, oil and vanilla.
Add the wet ingredients to the flour mixture and mix to combine. Add the bloomed cocoa and mix until smooth.
Pour batter into the prepared pan and bake for 30 minutes, checking at 20 minutes. A toothpick inserted in the center should come out clean.
Invert onto a cooling rack and cool completely before assembling.
Assemble the Cake
Once the cake is completely cool, spread the cinnamon bun spread over the top — about half the jar, or as much as you like.
Remove the ice cream layer from the freezer. Using the plastic wrap overhang, lift it out of the pan and place it on top of the cake non-smooth side down. Align the two layers carefully.
Return to the freezer while you make the whipped cream.
Make the Whipped Cream
Chill your mixing bowl and whisk attachment in the freezer for 10 minutes.
Add the cold heavy whipping cream, powdered sugar and vanilla to the chilled bowl.
Whisk on low speed, gradually increasing to medium-high, until firm peaks form. Do not over-whip.
Finish & Decorate
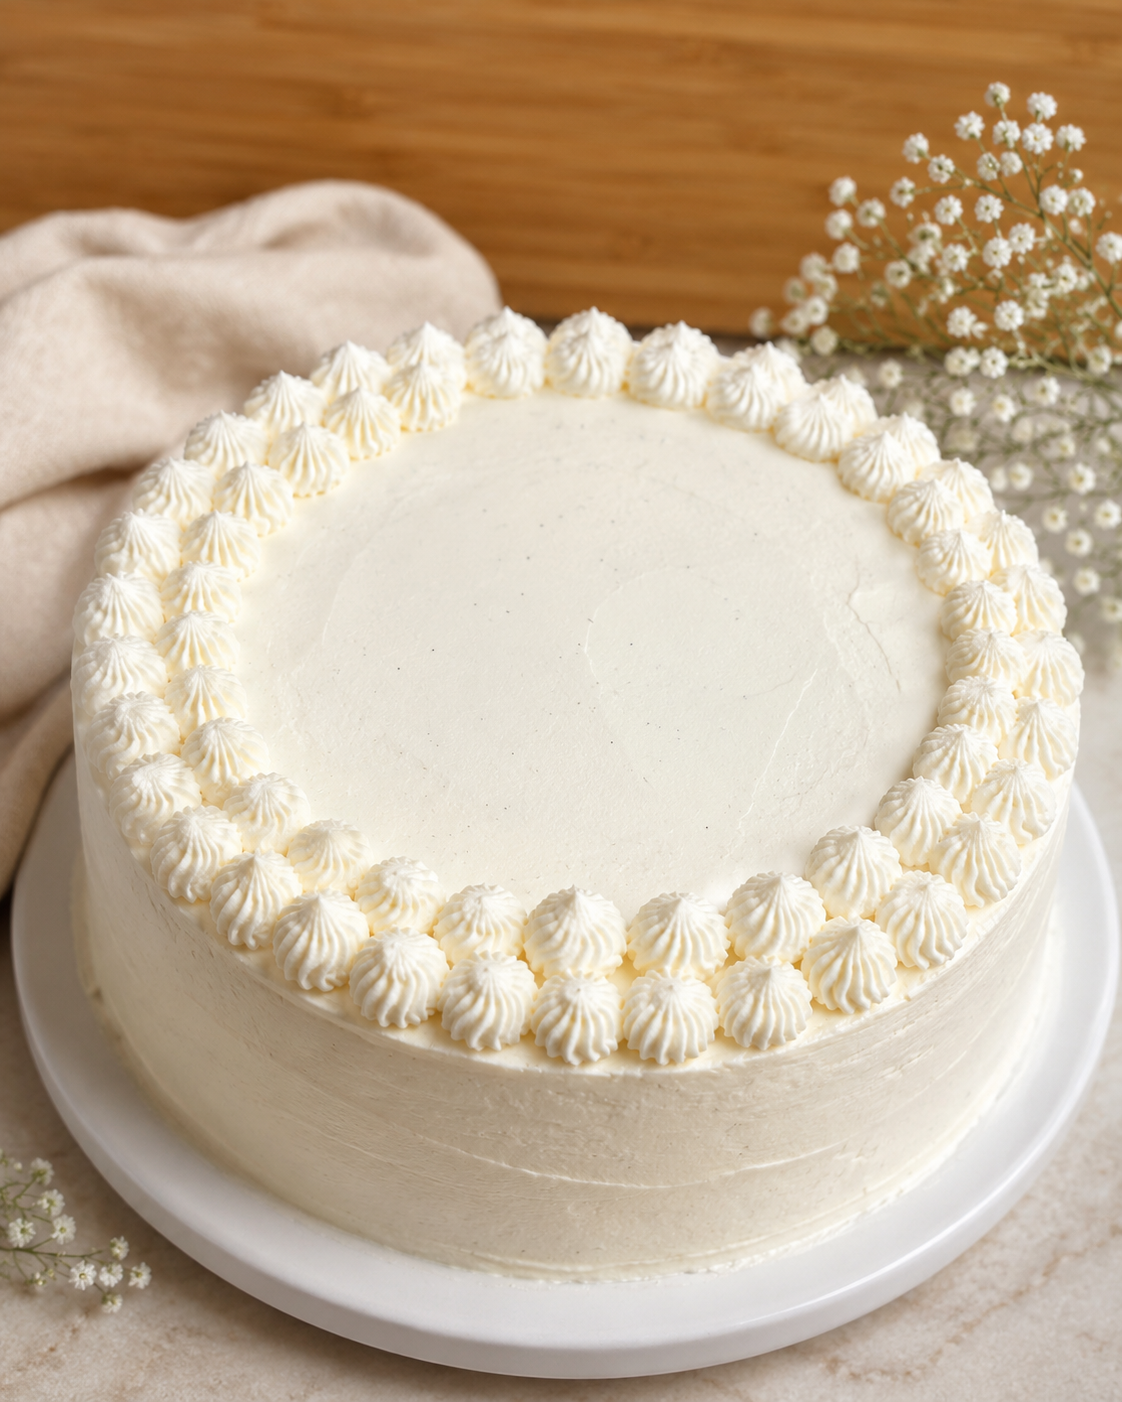
Remove the cake from the freezer. Working quickly, use a palette knife or spatula to fill the gap between the cake and ice cream layers with whipped cream. Smooth the sides and top.
Return to the freezer for 20 minutes to firm up.
Remove and decorate with the remaining whipped cream — pipe around the edges, add rosettes, or however you like. Drizzle or pipe the hot fudge over the top.
Freeze until ready to serve. Remove 5–10 minutes before slicing.
To Make Fully Dairy Free
Replace the following:
Milk in the cake → any non-dairy milk in equal quantity
Ice cream → your favourite non-dairy ice cream
Heavy whipping cream → Califia Farms non-dairy whipping cream
Cinnamon bun filling → homemade non-dairy chocolate ganache (recipe below)
Non-Dairy Chocolate Ganache Filling
Guittard dark chocolate chips
Califia Farms non-dairy whipping cream
Melt chocolate in a double boiler until smooth.
Heat non-dairy cream in a separate saucepan until it just begins to simmer — do not boil.
Pour the hot cream over the melted chocolate and mix until smooth and glossy.
Let sit 2–3 minutes. Allow to cool before using as filling.
After assembling with the ganache filling, chill the cake longer before adding the non-dairy whipped topping — the ganache needs more time to set than the cinnamon spread.
Notes
Coffee vs water: Strongly recommend hot coffee for blooming the cocoa — you will not taste the coffee but it deepens the chocolate flavour significantly.
Ice cream flavour: Any flavour works. Strawberry, coffee, salted caramel, chocolate — use what you love or what fits the occasion.
Can't find cinnamon bun spread: Biscoff, thick caramel sauce or Nutella all work as alternatives.
Knife tip: Warm your knife under hot water and dry it before each slice for clean, beautiful cuts.
Happiness is Homemade · saveurbyv.com